
hat’s one of the only things to stop New Yorkers dead in their tracks? Manhattanhenge. I’m a photographer of all things New York with a specialty in aerial photography. While I have yet to capture Manhattanhenge from above, it is one of my favorite events to shoot with my feet firmly on the ground.
What is Manhattanhenge?
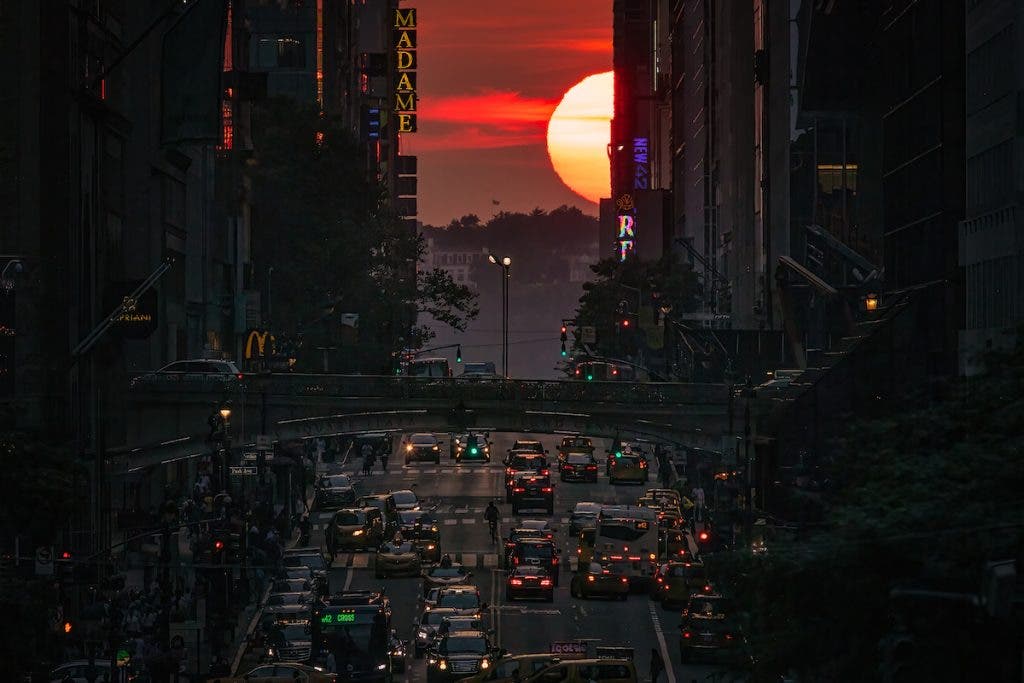
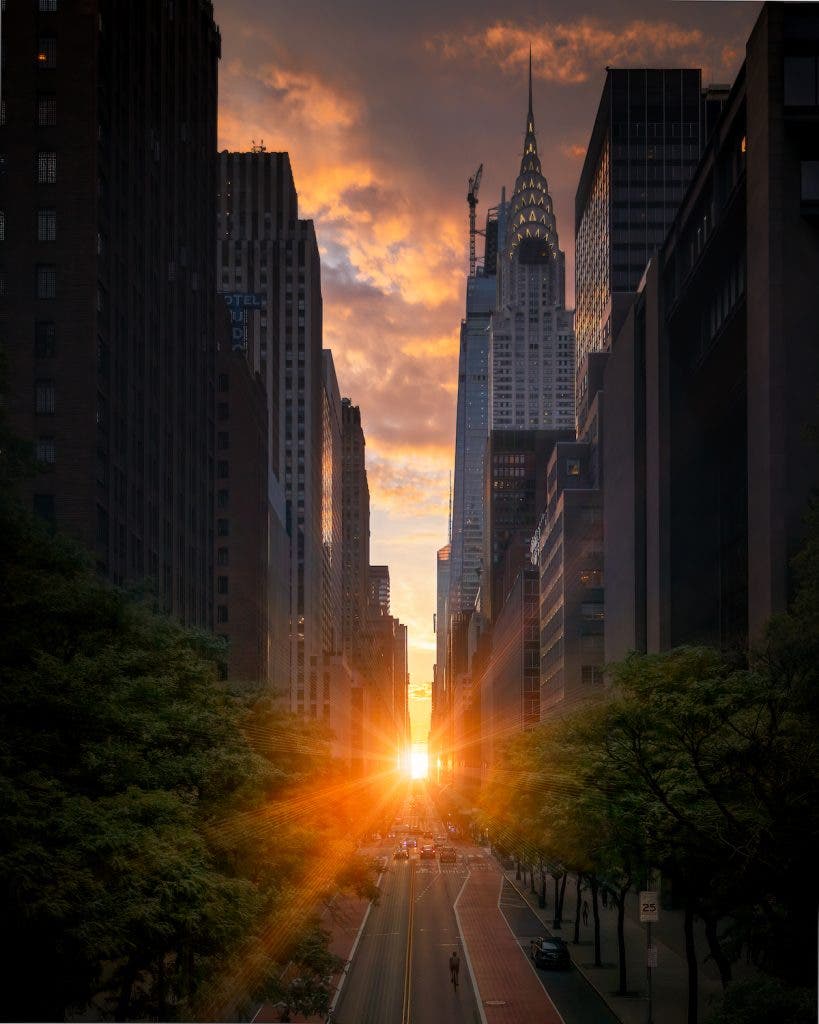
Manhattanhenge, as coined by Neil Degrasse Tyson, is a celestial phenomenon that happens just prior to and after the summer solstice. During this time the sun sets in alignment with Manhattan’s streets that run east to west, providing New Yorkers with a dazzling view in the evening.
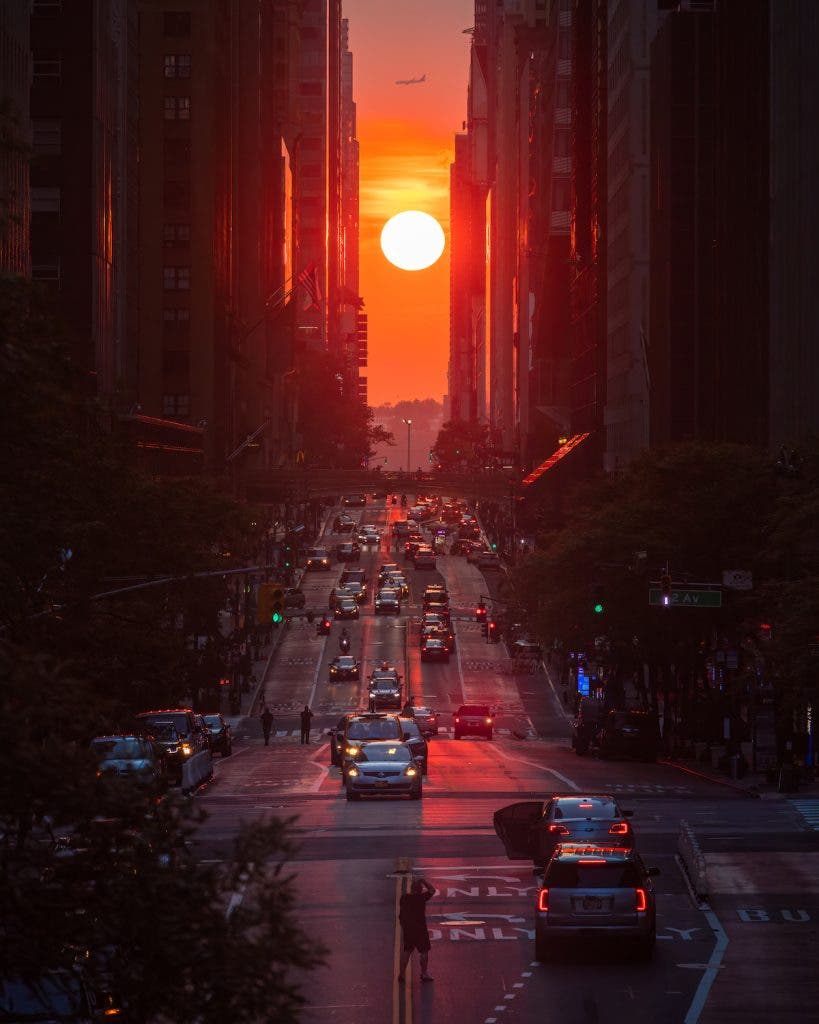
On the traditional dates that are recognized as Manhattanhenge, the sun sets on the horizon line itself and the full sun can seen between Manhattan’s street. On the second night, the sun will set half-covered at the horizon line. However, as long as the weather cooperates, you have just over six weeks where the sun transverses the streets on a nightly basis.
This year, the Manhattanhenge season comes to an end on July 12th and July 13th. You can expect throngs of people coming to witness and photograph on these days.
Where to Photograph Manhattanhenge
You can view and photograph manhattanhenge on any street that has an unobstructed western view of the horizon. However, some of the wider streets that are ideal for viewing are:
- 14th Street
- 23rd Street
- 34th Street
- 42nd Street
The most popular locations are along 42nd Street. One such location, the Tudor City Overpass, has become the most popular to view Manhattanhenge because it’s elevated and the view offers a near-perfect vanishing point perspective. Overall, it’s an incredible scene when New York City’s residents swarm the streets to witness the setting sun.
If you’re not really into fighting for a shot with thousands of people, Gantry Plaza State Park in Long Island city is another alternative. With a direct line of sight across the east river to 42nd Street, this is an option for those photographers with telephoto zooms, like 100-500mm or 200-600mm lenses.
When to Photograph Manhattanhenge
This year’s sunset — when the full sun is setting on the horizon line — is July 12th at 8:20 pm. The half sun is visible on July 13th at 8:21 pm.
Since these are the two most popular dates, photographers should arrive hours before the sunset if they want to secure a location that matches their artistic vision. In the past, I have arrived up to five hours early to secure my spot along the overpass fence. However, if the forecast is right, you may consider an earlier time to ensure you are setting yourself up for success.
If you cannot make it to Tudor City that early, you can find places along all the aforementioned streets to shoot. Although, you may have to adjust what kind of image you will be capturing if you are at street level.
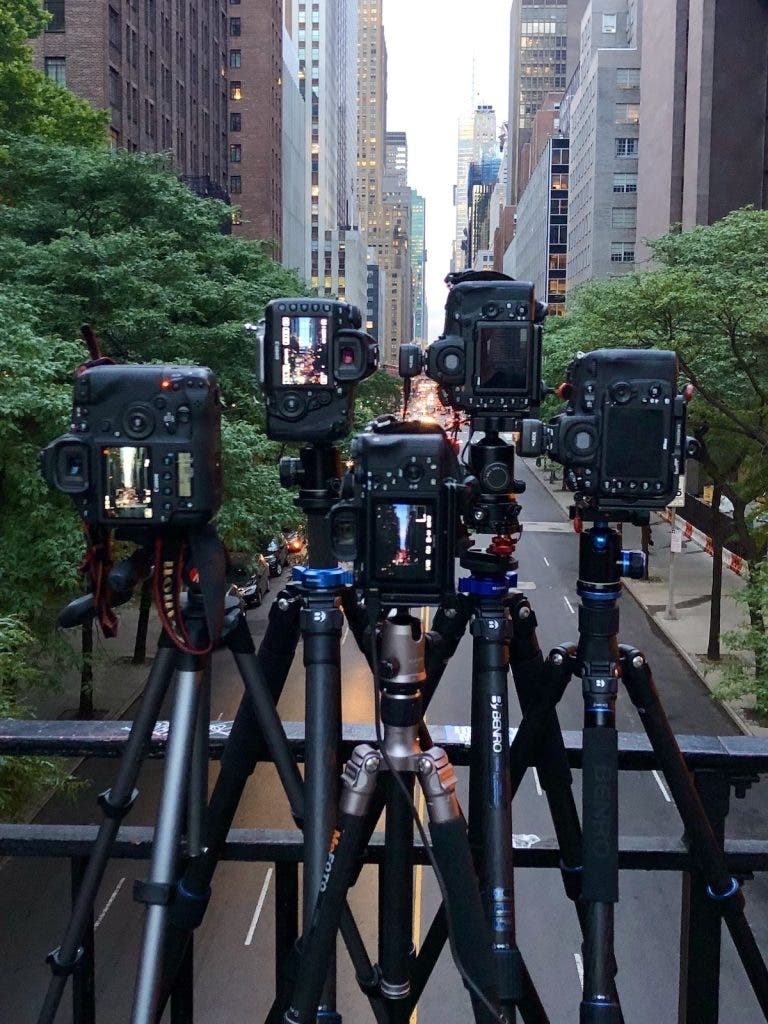
Gear to Photograph Manhattanhenge
Every photographer has their preferred setup. Camera brand allegiances aside, there are generally two approaches that photographers take when shooting Manhattanhenge.
Lenses
If you have the luxury of having two camera bodies, a perfect setup would be:
- A wide-angle zooms lens (like a 16-35mm or a 24-70mm)
- A telephoto zoom lens ( like a 70-200mm or 100-400mm)
This will not only allow you to shoot the details of the sun as it crosses the street, but will also allow you to tell the story of the experience by showing all of your surroundings.
Tripod
The above-mentioned setups are perfect to be used at Tudor City Overpass, as you are not on the street and don’t have to be particularly quick with your execution. If you do decide to shoot with this combination of camera bodies and lenses, a tripod will help immensely. Having at least one tripod will allow you to shoot the longer detail shot on a stable platform, while hand-holding the wider angle lens setup. If you aren’t in a place where you can have a tripod, shooting with lenses that have focal lengths of 24-70mm, 24-105mm, or even a 70-200mm is perfectly doable considering the amount of light present.
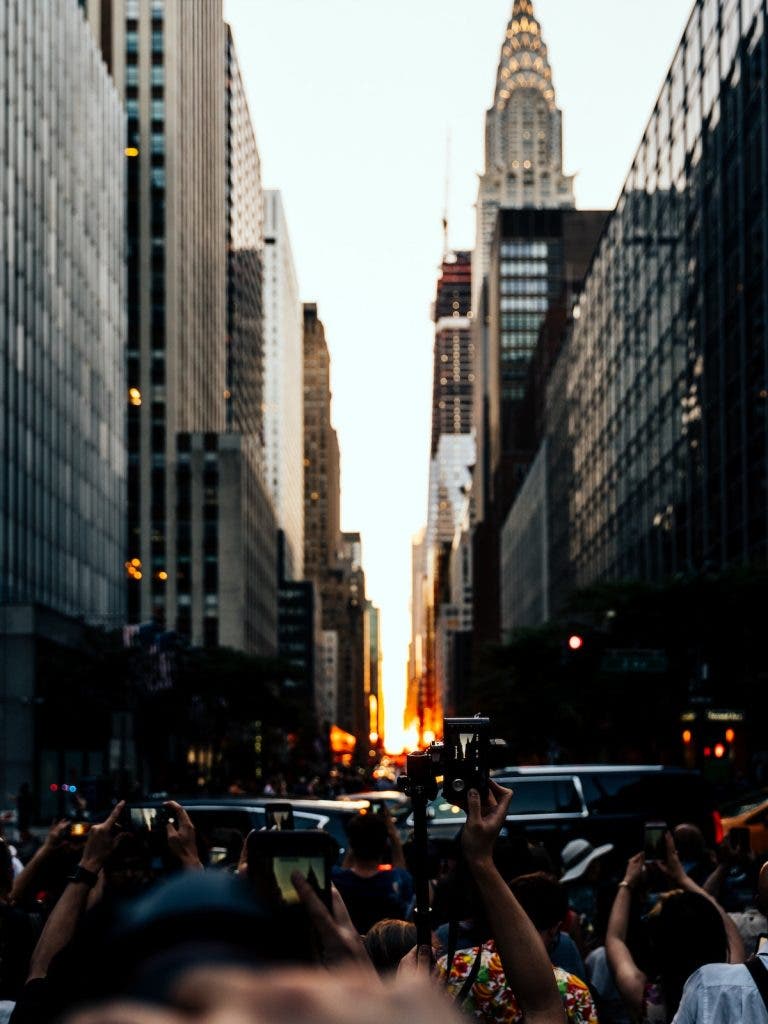
However, as I said before, being at street level with no elevation, you may choose to shoot the human story of this special event. For instance, a wider angle shot of all the cameras being lifted above people’s heads to capture Manhattanhenge tells just as powerful a story when captured correctly.
GoPro
If you are going for the full tripod setup, there are other items that can round out your coverage of Manhattanhenge. A GoPro mounted to either your tripod or camera’s hot shoe can be a great way to capture a timelapse of the event with one constant focal length.
Intervalometer
An intervalometer can help free up shooting on a camera body as well. Most cameras these days have built-in intervalometers to capture timelapses. All you would have to do is set the amount of frames desired (30 individual frames per one second of video time, 300 frames for a ten second timelapse), and the amount of time between each frame taken. The shorter the amount of time between frames, the smoother the transition but longer run time.
Camera Settings to Capture Manhattanhenge
You’ll have one incredibly bright light source — the sun — that will be controlling a lot of the creative aspects of your photos. Depending on the desired outcome, you can use two approaches.
Clean Sun Approach
The first approach is the “clean sun.” This will require you to expose for the sun itself, creating a clean round sun as it traverses the street. The difficult aspect of this shot is the need to set up as the sun is appearing from behind the buildings. However, once the desired exposure is reached, you can set and forget it.
This type of shooting creates an image that has a lot of contrast. This will take a bit of work in your post-processing flow to recover some of the shadows and details of the buildings. For this reason, I want to shoot at a lower ISO to lessen the chance of encountering digital noise. I would recommend an ISO between 100-400.
The two other factors that go into the proper exposure are f-stop, or aperture, and shutter speed. The aperture is the opening on the lens that controls the amount of light that is coming through the lens and hitting the sensor. It also controls the depth of field, meaning the amount of the entire frame that appears to be in focus. When shooting landscapes, such as Manhattanhenge, a good range of aperture is f/7.1 to f/13. Typically, when I am setting up a shot for the first time, my go-to aperture setting is f/9.0. I find that this gives me a frame that is mostly in focus throughout, but also has just a touch of softness to the edge of the frame that gently guides the eye inward towards the subject.
My shutter speed will vary to make sure that I have the proper exposure for the sun and am freezing any moving elements such as people, cars, planes, etc. For the exposure alone, typically my shutter speed is close to 1/1000 sec.
Starburst Sun Approach
If you are more interested in telling the story of the entire scene — including the vanishing point view, with the Chrysler Building, One Vanderbilt, and the theaters along 42nd Street in scene — then we have different parameters. Another popular approach is to shoot wide and attempt to shoot the sun as a “starburst.”
You can achieve this by shooting with your lens’ aperture set to between f/11 to f/16. Some may choose to close the aperture down further up to f/22, but this is my comfort range. By closing down the aperture, the light is forcing its way through a smaller opening in your lens. The starburst effect is achieved because the light is finding a way between the blades of your lens.
Different lenses have a different number of blades. Therefore, the outcome may vary depending on your lens type. To achieve a larger sunburst, you much shoot at a slower shutter speed than the “clean sun” image. This allows more of the light to penetrate the blades and create a larger sunburst.
General Manhattanhenge Tips
Here are a few non-photography tips for first-time photographers who are seeking to photograph Manhattanhenge:
Get to your desired location early…like early, early. People have been known to spend the whole day at the location to secure their spot. If this sounds like you, think about bringing a small folding camp chair, water and food, and sunscreen. These will make the waiting that much easier.
Know the frame that you want to get. If you want a center-weighted shot, you will have to position yourself in the middle of the road, or on the overpasses, or at the rail in Gantry Plaza State Park.
There will be a lot of people attempting to do the same thing you’re doing that day, so if you can’t get there early, you may want to team up with someone who can. Perhaps they’ll be kind enough to set up an extra tripod to save a spot.
If this isn’t possible, then be aware that everyone will be jockeying for a position. You either need to be ok with being in photo scrum, or find creative ways to tell the same story differently than others. Take an off-angle shot. Include the masses in your image. Tell the story of the experience rather than the actual event itself.
Final Thoughts
I know this sounds intense — it is. But it’s also amazing! Witnessing the streets fill with light, the long shadows, the excitement of this fleeting moment shared with others, it’s a memory and that’s what you are endeavoring to capture. Remember, get there early, have a gear check list, visualize your desired shots, get your settings dialed in quickly as the sun moves, and remember to take half a second to take it all in.


